7 Quick Tips About Being Safe on Public Wi-Fi

It won’t be wrong to say that these days a normal human being is surrounded by Technology round the clock from all corners and with the intrusion of INTERNET , Wi-Fi, and similar technologies, this has worsened even more. Public Wi-Fi is meant to provide their services to tons of people at the same instance of time and no matter if they are password protected or not, they are always unsafe and can never stand at par with the protection level that a private Home Network can provide.
However, just the usage of Wi-Fi at public places can never threaten user’s data wholly, but one must take precautions to protect it to the maximum. So, read on to understand some basic tips and tricks that can be used with ease to safeguard the data from getting compromised over public Wi-Fi:
1. Avoid Sharing on Remote PC’s
It is a very common practice for a noob user to locally share all his music collection, documents and other stuff on different PC’s connected over local LAN connection setup in the home. This is usually more seen at those places that have inbuilt cyberspace and the probability of allowing remote login from different PC’s over the same network adds to the security breach. One of the most easiest ways of avoiding data leak in such a scenario is to completely disable the Sharing options before interconnecting the system over open Wi-Fi and thus preventing unauthorized access to the system.
HOW TO: Follow the process below to disable the Sharing on your respective platform:
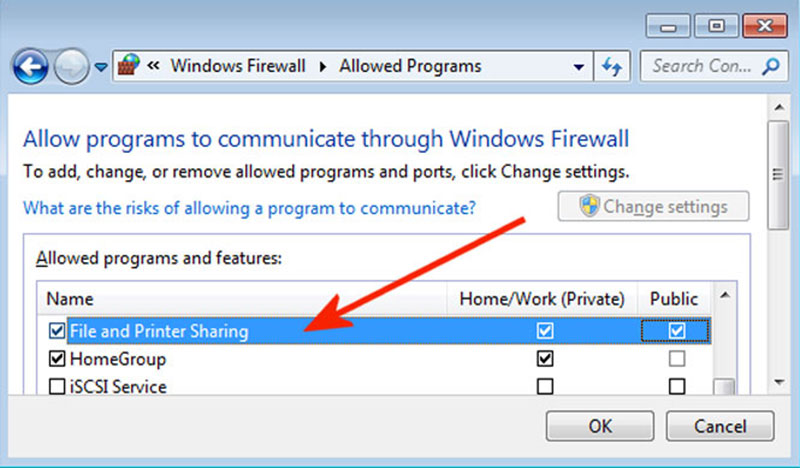
- Windows: Open the Control Panel on the system and then navigate to Network Settings >> HomeGroup >> Advanced Sharing Settings. Once you are here, you can easily toggle the File and Printer Sharing and the Network Discovery option to reset the visibility of system over the same network.
- Mac: Simply visit System Preferences and click Sharing. Here, make sure none of the options are check marked.
2. Grab a VPN Connection
Virtual Private Networks or simply VPN as many know and call it act as a boon to the users since it despite being on a public WiFi routes traffic through a safe network that allows the user to use all the benefits of the same without worrying about the data loss. Another factor that makes VPN a better choice is that most VPN services are free to use, however if you wish to make sure that your connection over public Wi-Fi is secured, head over to a paid VPN service.
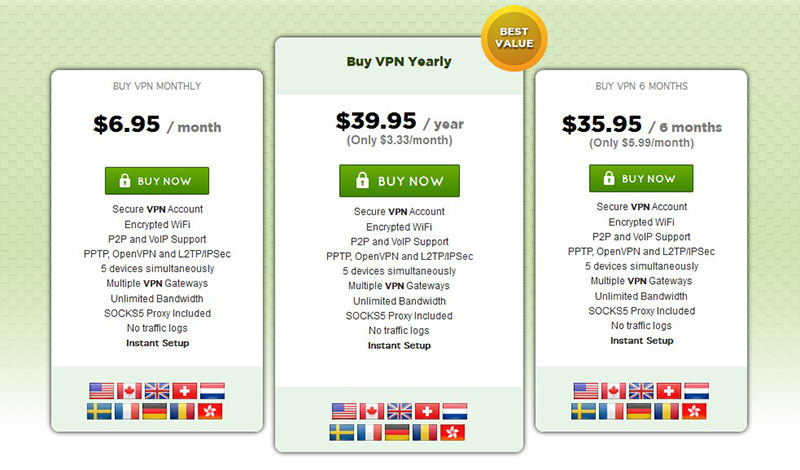
Note: Though there are many good deals available that one can bargain for, however, do check out Private Internet Access VPN provider available for a monthly cost of $6.95 giving unlimited bandwidth and multiple exit points that enable you to choose which country your network traffic should be routed through.
3. Prefer HTTPS over HTTP
HTTPS got incorporated into the World Wide Web in the late 2000s and early 2010s and it is beneficial and a must take step for a user since in case of HTTP, websites usually transfer content in form of a plain text and hence its easier to breach the security and today considering the online scam and other significant threats, major websites have started using HTTPS to encrypt the data transfer. But, despite all the promises one mustn’t rely completely on the website or the Web Service in use and must exercise caution.
If one looks at the process of How to create an Encrypted connection, Google SERP shows endless results, however, read below to know one of the easiest methods of implementing HTTPS on your local system or over the network using a browser:
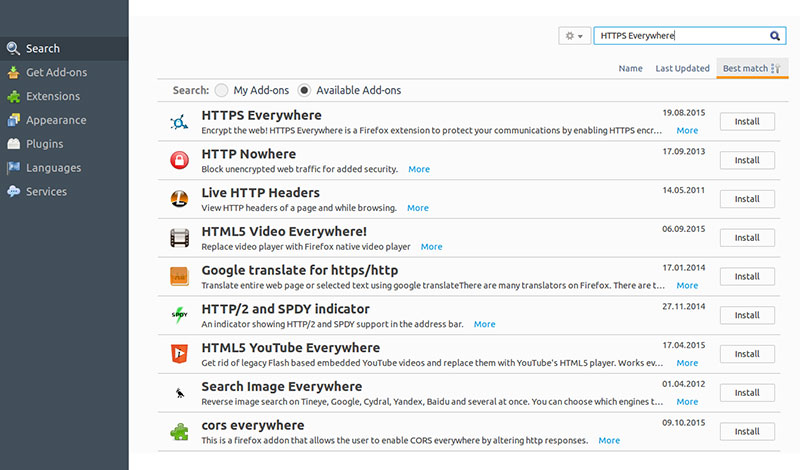
- Google Chrome: Head over to Settings>> Extensions (on the left side) >> Get More Extensions. Once the window opens up, type HTTPS Everywhere in the search box and install it. You can also checkmark the Allow in Incognito check box if you wish to enable the plugin in the Incognito window as well.
- Firefox: Open a new window of Firefox browser on your system. Click on Tools >> Add-ons (Ctrl + Shift + A). Search for the plugin HTTPS Everywhere and install it. The system would ask for browser restart, do that and you would be welcomed by a dialogue box. Click YES and be rest assured of the safety of your data.
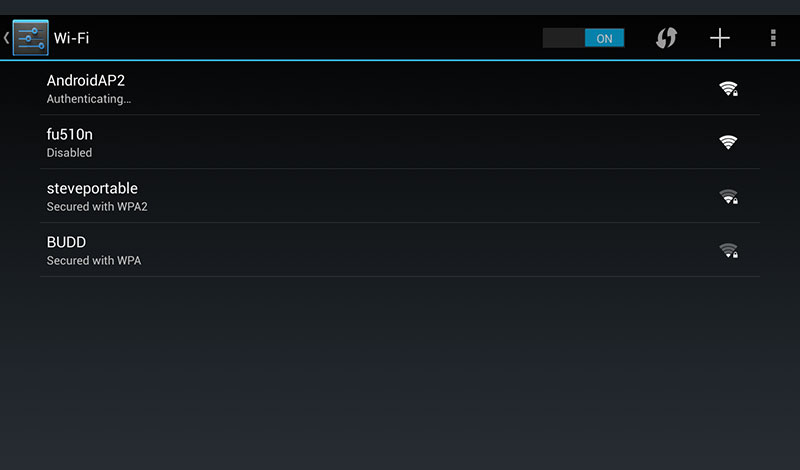
4. Toggle Automatic Connections to Wi-Fi Hotspots
Not many know, but the privacy of a smartphone is compromised even when it is set to automatically connect to available Wi-Fi hotspots in its vicinity and hence users are advised to keep this setting as OFF all the time unless required. If the setting remains open, it would allow the device to get connected to any available network (without explicit permission) which may or may not be malicious. Though most of the latest smartphones do have this option disabled by default now, however in case you find it ON, toggle it using the below-mentioned procedure:
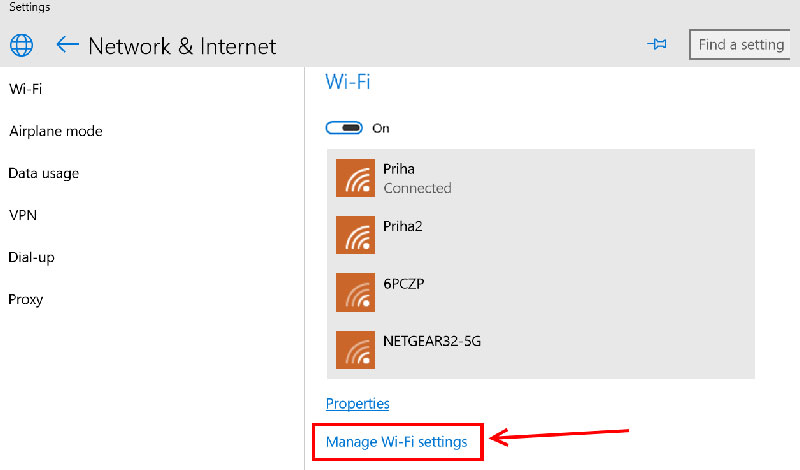
Head over to Settings and then open the Wi-Fi section of the device. In case the option to disable Auto-connect is hidden, it implies that you are completely safe, else, simply toggle it to OFF mode and you are done.
5. Implement Two-Step Verification
The Two-Step Verification technique is not much old, but it certainly has captured the attention of almost everyone, thanks to its double layer of protection. The term Two-step verification requires two separate pieces of information i.e., one that is known to the user, and one that he possess. The latter these days usually come in the form of a One-Time Password (OTP) sent via SMS onto the concerned device.
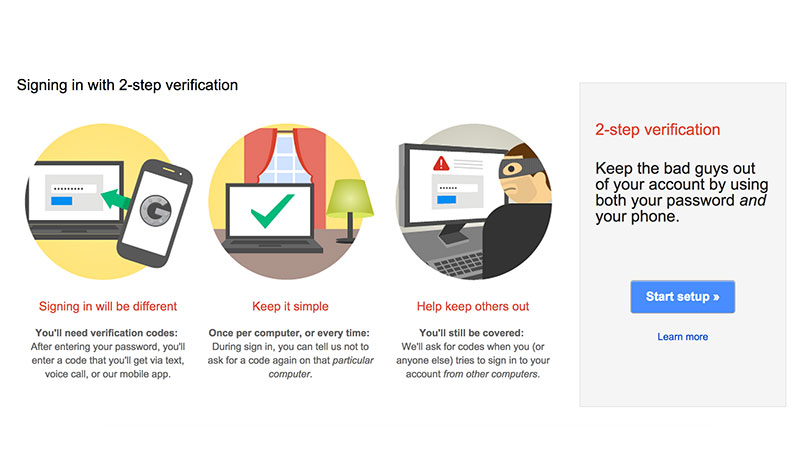
E-mail messaging service Gmail too supports the Two-Step Authentication feature alongside several other websites and services. To enable the feature on your Gmail account, follow the steps as given below:
- Log into your respective Google account and navigate to the Settings page.
- Proceed to Accounts and Import tab and click Other Google Account Settings.
- Under the My Account page, open the Sign-in and Security option and enable the Two-step verification feature in case it’s disabled.
- Insert the phone number and choose the appropriate method. Depending on the chosen method, you will get a six-digit code or a call.
- Enter the code when prompted and the service would start functioning and henceforth, whenever you will use a different PC to log into Google verification of identity will be done.
6. Password Protect Your Accounts
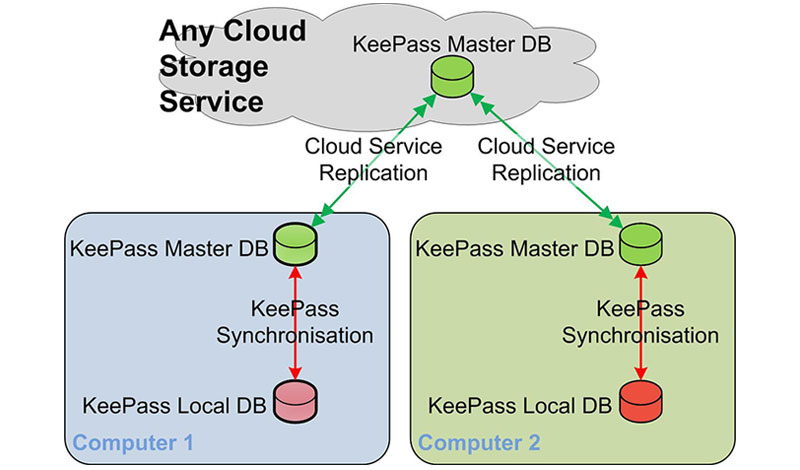
One of the major reasons that gives hackers a breakthrough in cracking down the security is because most of us are in the habit of using the same password on all our major accounts and if one does get compromised, the chances of others getting compromised increases and hence users are constantly advised to keep different passwords for different accounts and to keep changing them frequently usually once every three months. Since remembering different passwords can be tricky so the best feasible method is to use password manager applications on the system like KeePass or LastPass.
- KeePass: It generates an encrypted database file and keeps it stored locally on the computer itself.
- LastPass: It rather than storing everything locally, stores all the credentials on the cloud.
7. Authenticate Network Name
Knowing the correct network name is crucial to prevent data loss. Hackers often use malicious and fake names to divert users and few of the not-so-techie ones get caught in the vicious circle endangering their own confidential data. It is advisable to the users that they must ask for the official network name from any of the working staff in case users need to connect to a public Wi-Fi since these people are always aware of the actual network name set up by the organization. However, if it seems impossible to talk to any staff personnel, then one must avoid getting connected ensuring his own safety.
7 Quick Tips About Being Safe on Public Wi-Fi
http://www.blog.sagmart.com/wp-content/uploads/2016/04/Publc-Wi-Fi-300x300.jpg Technology
It won’t be wrong to say that these days a normal human being is surrounded by Technology round the clock from all corners and with the intrusion of INTERNET , Wi-Fi, and similar technologies, this has worsened even more. Public Wi-Fi is meant to provide their services to tons of people at the same instance of time and no matter if they are password protected or not, they are always unsafe and can never stand at par with the protection level that a private Home Network can provide.
However, just the usage of Wi-Fi at public places can never threaten user’s data wholly, but one must take precautions to protect it to the maximum. So, read on to understand some basic tips and tricks that can be used with ease to safeguard the data from getting compromised over public Wi-Fi:
1. Avoid Sharing on Remote PC’s
It is a very common practice for a noob user to locally share all his music collection, documents and other stuff on different PC’s connected over local LAN connection setup in the home. This is usually more seen at those places that have inbuilt cyberspace and the probability of allowing remote login from different PC’s over the same network adds to the security breach. One of the most easiest ways of avoiding data leak in such a scenario is to completely disable the Sharing options before interconnecting the system over open Wi-Fi and thus preventing unauthorized access to the system.
HOW TO: Follow the process below to disable the Sharing on your respective platform:
- Windows: Open the Control Panel on the system and then navigate to Network Settings >> HomeGroup >> Advanced Sharing Settings. Once you are here, you can easily toggle the File and Printer Sharing and the Network Discovery option to reset the visibility of system over the same network.
- Mac: Simply visit System Preferences and click Sharing. Here, make sure none of the options are check marked.
2. Grab a VPN Connection
Virtual Private Networks or simply VPN as many know and call it act as a boon to the users since it despite being on a public WiFi routes traffic through a safe network that allows the user to use all the benefits of the same without worrying about the data loss. Another factor that makes VPN a better choice is that most VPN services are free to use, however if you wish to make sure that your connection over public Wi-Fi is secured, head over to a paid VPN service.
Note: Though there are many good deals available that one can bargain for, however, do check out Private Internet Access VPN provider available for a monthly cost of $6.95 giving unlimited bandwidth and multiple exit points that enable you to choose which country your network traffic should be routed through.
3. Prefer HTTPS over HTTP
HTTPS got incorporated into the World Wide Web in the late 2000s and early 2010s and it is beneficial and a must take step for a user since in case of HTTP, websites usually transfer content in form of a plain text and hence its easier to breach the security and today considering the online scam and other significant threats, major websites have started using HTTPS to encrypt the data transfer. But, despite all the promises one mustn’t rely completely on the website or the Web Service in use and must exercise caution.
If one looks at the process of How to create an Encrypted connection, Google SERP shows endless results, however, read below to know one of the easiest methods of implementing HTTPS on your local system or over the network using a browser:
- Google Chrome: Head over to Settings>> Extensions (on the left side) >> Get More Extensions. Once the window opens up, type HTTPS Everywhere in the search box and install it. You can also checkmark the Allow in Incognito check box if you wish to enable the plugin in the Incognito window as well.
- Firefox: Open a new window of Firefox browser on your system. Click on Tools >> Add-ons (Ctrl + Shift + A). Search for the plugin HTTPS Everywhere and install it. The system would ask for browser restart, do that and you would be welcomed by a dialogue box. Click YES and be rest assured of the safety of your data.
4. Toggle Automatic Connections to Wi-Fi Hotspots
Not many know, but the privacy of a smartphone is compromised even when it is set to automatically connect to available Wi-Fi hotspots in its vicinity and hence users are advised to keep this setting as OFF all the time unless required. If the setting remains open, it would allow the device to get connected to any available network (without explicit permission) which may or may not be malicious. Though most of the latest smartphones do have this option disabled by default now, however in case you find it ON, toggle it using the below-mentioned procedure:
Head over to Settings and then open the Wi-Fi section of the device. In case the option to disable Auto-connect is hidden, it implies that you are completely safe, else, simply toggle it to OFF mode and you are done.
5. Implement Two-Step Verification
The Two-Step Verification technique is not much old, but it certainly has captured the attention of almost everyone, thanks to its double layer of protection. The term Two-step verification requires two separate pieces of information i.e., one that is known to the user, and one that he possess. The latter these days usually come in the form of a One-Time Password (OTP) sent via SMS onto the concerned device.
E-mail messaging service Gmail too supports the Two-Step Authentication feature alongside several other websites and services. To enable the feature on your Gmail account, follow the steps as given below:
- Log into your respective Google account and navigate to the Settings page.
- Proceed to Accounts and Import tab and click Other Google Account Settings.
- Under the My Account page, open the Sign-in and Security option and enable the Two-step verification feature in case it’s disabled.
- Insert the phone number and choose the appropriate method. Depending on the chosen method, you will get a six-digit code or a call.
- Enter the code when prompted and the service would start functioning and henceforth, whenever you will use a different PC to log into Google verification of identity will be done.
6. Password Protect Your Accounts
One of the major reasons that gives hackers a breakthrough in cracking down the security is because most of us are in the habit of using the same password on all our major accounts and if one does get compromised, the chances of others getting compromised increases and hence users are constantly advised to keep different passwords for different accounts and to keep changing them frequently usually once every three months. Since remembering different passwords can be tricky so the best feasible method is to use password manager applications on the system like KeePass or LastPass.
- KeePass: It generates an encrypted database file and keeps it stored locally on the computer itself.
- LastPass: It rather than storing everything locally, stores all the credentials on the cloud.
7. Authenticate Network Name
Knowing the correct network name is crucial to prevent data loss. Hackers often use malicious and fake names to divert users and few of the not-so-techie ones get caught in the vicious circle endangering their own confidential data. It is advisable to the users that they must ask for the official network name from any of the working staff in case users need to connect to a public Wi-Fi since these people are always aware of the actual network name set up by the organization. However, if it seems impossible to talk to any staff personnel, then one must avoid getting connected ensuring his own safety.
Leave a Reply