How To Install Android P or roll back to oreo on your Pixel phone
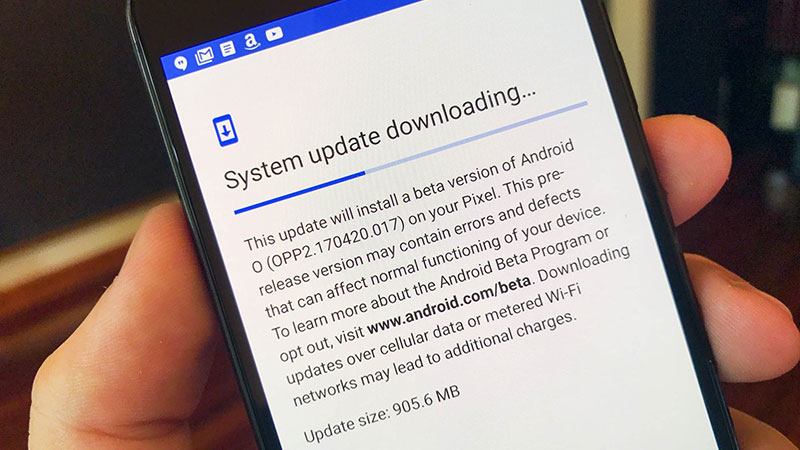
The first public Android P beta version is available in form of the second developer preview. The easiest way to opt in and out for Android P preview is to go with Android Beta program. If you are hardware friendly and want to opt for the Android P developer preview manually, here are the instructions as well.
![]()
Android Beta:
If you do not want to bother with some hardcore setting and bootloader unlocking process or the command line, you can easily opt for Android P if you have already joined the Android Beta program. With the compatible devices, you can just go to the Android Beta portal and opt-in for the beta program, which will expedite Google to send an over-the-air update.
- With your Pixel phone, go to Android Beta program portal
- Sign in through Google account attached with the Phone
- Scroll down and find your device to opt-in for the Beta program
- Follow the steps to confirm the over-the-air download.
Opting out the Beta program is also easy, you just need to tap an opt-out button on Beta program page. Your phone will get an over-the-air update in order to go back to Stable Version of Android, but your phone will process re-boot, so back up your data first.
Eligible Devices For Android Beta Program:
- Pixel
- Pixel XL
- Pixel 2 XL
- Pixel 2
The Phones Expected To Be Android P Compatible Soon:
- OnePlus 6
- Xiaomi Mi Mix 2S
- Nokia 7 Plus
- Sony Xperia XZ2
- Vivo X21
- Essential PH‑1
- OPPO R15 Pro
Opting-In Through Bootloader:
Go For Android P On A Pixel 2 XL
Before we move ahead, it is necessary for you to have a brief knowledge about working with the Terminal (OS X or Linux) or Android SDK (software development kit) or Command Prompt (Windows), because it is possible that your device may harm in midway when you go wrong in any process.
To install the Android SDK, go to the Android Development website and follow the steps to install it correctly first. To perform the following process, it is required to have ADB and fast boot files which are placed in the Platform Tools folder, therefore read out the description given at the dev site and then go for right download.
![]()
Further, all the mentioned commands are written in a format of Terminal on a Linux or OS X platform. If you are using a Windows machine, you do not require to use the “./” mentioned in the guide below. Just follow the rest command step-by-step as listed and you will be there.
Tap For USB Debugging And Developer Settings:
- Click on setting option and visit about Phone/Tablet.
- Click on the Build number 7 times in order to make the dialog box understand that you are a developer.
- Again return to the Settings and you will see a new choice named Developer options. Click on the Developer options.
- Ascertain that the developer option is tapped to on and USB debugging is going on.
- Connect your device to your computer and go for “OK” tab on the dialog box which is asking to give permission for USB debugging when
plugged-in to the computer. You can as well choose always option to permit access on that computer any time.
If all goes well, the USB debugging ends here.
Unlock Bootloader:
Pixel phones purchased from Google have a bootloader beforehand, you just need to unlock it. In order to flash software manually, you need to follow these steps:
The first step is to boot into your bootloader. It can be done either way by directly turn off phone or tablet and press the power and volume down button together to enter Bootloader Menu or follow the command as given below.
Run the given command in order to check that your phone or tablet is plugged-in to your computer properly. If it shows a string of characters, you can st
art updating the device.
./adb devices
To go into the Bootloader menu, run the given command in your device.
./adb reboot bootloader
You will see a list of things including lock state of the device at the bottom of the screen. It will show locked, although if you have unlocked in past and didn’t lock it again, then it will say unlock.
To unlock the Bootloader, you need to enter the given commands. Pay heed that unlocking will make the handset factory reset and which will clear all the storage. If you forget to backup, you need to hit the power button when Start is pointed out in the Bootloader menu and this will return your device back to normal stage. Now you can again proceed to unlock the Bootloader.
./fastboot flashing unlock
When you will type this command, a dialogue box will pop up asking to make sure that you are unlocking. As it will factory reset the device, to go back you need to press No with a power button. To unlock, you need to press volume up and power button together.
./fastboot reboot-bootloader
It is advisable to reboot the bootloader only to make sure that everything is fine before going to the next step.
Flash the Stock Firmware Image
As the Bootloader is unlocked, now you can flash the new firmware. To check the images available for developer preview, go to the Developer Preview download page, select your device and the latest factory image available. Move forward and uncompress the downloaded file in the Platform Tools folder so that it can be easy to flash the firmware while choosing the path for various files.
To start, first, check that the Bootloader is unlocked and you are still in bootloader menu on the device.
Further, you also need to check that your computer is connected with the device properly. As the serial number of the device starts showing again, you can start updating the device.
./fastboot devices
Upload the bootloader with the below-provided command:
./fastboot flash bootloader [bootloader file].img
There will not be anything on the device screen but you will see a dialogue or command prompt. When flashing is done, you can reboot again to the bootloader to check that everything is working properly.
./fastboot reboot-bootloader
This step comes handy when you are updating the firmware on a device which has radios built into it. You flash the updated radios with this step.
./fastboot flash radio [radio file].img
./fastboot reboot-bootloader
Now it’s the time to flash the original system image.
./fastboot -w update [image file].zip
After all these steps you may find your device taking longer than before to boot and start as all the data of your device will be erased. After the restart, your device will be flashed with the latest version of the firmware.
If one doesn’t want to enter the commands manually than there is another way, that is, there are scripts included in the compressed folder which are containing the system image. Particularly, the flash-all script files will be automating the flashing bootloader, radios, if in case it’s needed and the system image. All in the process one must keep in mind that the bootloader must be unlocked and also it must be in the bootloader menu before initiating the script.
Now Let’s Roll Back The Software To Oreo
It’s time to roll back to Oreo if one had all the fun and desired to hover over the Android P. It is the fact that it is not stable at the current situation, so it is better to roll your device back to the stable version ii.e. Android Oreo. The steps are the same but there are only two steps which are not to be performed. First one, you don’t need to unlock the bootloader again, also one will have to download the Oreo factory image from the Google itself. Finally one will get back to the stock version again and probably one will again see the future developer preview build.
All these steps may seem very complex but everything happens for a reason and one might get a glimpse of what the Google has to offer in its next OS by the means of preview builds and Beta versions.
How To Install Android P or roll back to oreo on your Pixel phone
https://www.blog.sagmart.com/wp-content/uploads/2018/05/install-android-p-on-pixel-and-how-roll-back-oreo-300x300.jpg TechnologyThe first public Android P beta version is available in form of the second developer preview. The easiest way to opt in and out for Android P preview is to go with Android Beta program. If you are hardware friendly and want to opt for the Android P developer preview manually, here are the instructions as well.
![]()
Android Beta:
If you do not want to bother with some hardcore setting and bootloader unlocking process or the command line, you can easily opt for Android P if you have already joined the Android Beta program. With the compatible devices, you can just go to the Android Beta portal and opt-in for the beta program, which will expedite Google to send an over-the-air update.
- With your Pixel phone, go to Android Beta program portal
- Sign in through Google account attached with the Phone
- Scroll down and find your device to opt-in for the Beta program
- Follow the steps to confirm the over-the-air download.
Opting out the Beta program is also easy, you just need to tap an opt-out button on Beta program page. Your phone will get an over-the-air update in order to go back to Stable Version of Android, but your phone will process re-boot, so back up your data first.
Eligible Devices For Android Beta Program:
- Pixel
- Pixel XL
- Pixel 2 XL
- Pixel 2
The Phones Expected To Be Android P Compatible Soon:
- OnePlus 6
- Xiaomi Mi Mix 2S
- Nokia 7 Plus
- Sony Xperia XZ2
- Vivo X21
- Essential PH‑1
- OPPO R15 Pro
Opting-In Through Bootloader:
Go For Android P On A Pixel 2 XL
Before we move ahead, it is necessary for you to have a brief knowledge about working with the Terminal (OS X or Linux) or Android SDK (software development kit) or Command Prompt (Windows), because it is possible that your device may harm in midway when you go wrong in any process.
To install the Android SDK, go to the Android Development website and follow the steps to install it correctly first. To perform the following process, it is required to have ADB and fast boot files which are placed in the Platform Tools folder, therefore read out the description given at the dev site and then go for right download.
![]()
Further, all the mentioned commands are written in a format of Terminal on a Linux or OS X platform. If you are using a Windows machine, you do not require to use the “./” mentioned in the guide below. Just follow the rest command step-by-step as listed and you will be there.
Tap For USB Debugging And Developer Settings:
- Click on setting option and visit about Phone/Tablet.
- Click on the Build number 7 times in order to make the dialog box understand that you are a developer.
- Again return to the Settings and you will see a new choice named Developer options. Click on the Developer options.
- Ascertain that the developer option is tapped to on and USB debugging is going on.
- Connect your device to your computer and go for “OK” tab on the dialog box which is asking to give permission for USB debugging when
plugged-in to the computer. You can as well choose always option to permit access on that computer any time.
If all goes well, the USB debugging ends here.
Unlock Bootloader:
Pixel phones purchased from Google have a bootloader beforehand, you just need to unlock it. In order to flash software manually, you need to follow these steps:
The first step is to boot into your bootloader. It can be done either way by directly turn off phone or tablet and press the power and volume down button together to enter Bootloader Menu or follow the command as given below.
Run the given command in order to check that your phone or tablet is plugged-in to your computer properly. If it shows a string of characters, you can st
art updating the device.
./adb devices
To go into the Bootloader menu, run the given command in your device.
./adb reboot bootloader
You will see a list of things including lock state of the device at the bottom of the screen. It will show locked, although if you have unlocked in past and didn’t lock it again, then it will say unlock.
To unlock the Bootloader, you need to enter the given commands. Pay heed that unlocking will make the handset factory reset and which will clear all the storage. If you forget to backup, you need to hit the power button when Start is pointed out in the Bootloader menu and this will return your device back to normal stage. Now you can again proceed to unlock the Bootloader.
./fastboot flashing unlock
When you will type this command, a dialogue box will pop up asking to make sure that you are unlocking. As it will factory reset the device, to go back you need to press No with a power button. To unlock, you need to press volume up and power button together.
./fastboot reboot-bootloader
It is advisable to reboot the bootloader only to make sure that everything is fine before going to the next step.
Flash the Stock Firmware Image
As the Bootloader is unlocked, now you can flash the new firmware. To check the images available for developer preview, go to the Developer Preview download page, select your device and the latest factory image available. Move forward and uncompress the downloaded file in the Platform Tools folder so that it can be easy to flash the firmware while choosing the path for various files.
To start, first, check that the Bootloader is unlocked and you are still in bootloader menu on the device.
Further, you also need to check that your computer is connected with the device properly. As the serial number of the device starts showing again, you can start updating the device.
./fastboot devices
Upload the bootloader with the below-provided command:
./fastboot flash bootloader [bootloader file].img
There will not be anything on the device screen but you will see a dialogue or command prompt. When flashing is done, you can reboot again to the bootloader to check that everything is working properly.
./fastboot reboot-bootloader
This step comes handy when you are updating the firmware on a device which has radios built into it. You flash the updated radios with this step.
./fastboot flash radio [radio file].img
./fastboot reboot-bootloader
Now it’s the time to flash the original system image.
./fastboot -w update [image file].zip
After all these steps you may find your device taking longer than before to boot and start as all the data of your device will be erased. After the restart, your device will be flashed with the latest version of the firmware.
If one doesn’t want to enter the commands manually than there is another way, that is, there are scripts included in the compressed folder which are containing the system image. Particularly, the flash-all script files will be automating the flashing bootloader, radios, if in case it’s needed and the system image. All in the process one must keep in mind that the bootloader must be unlocked and also it must be in the bootloader menu before initiating the script.
Now Let’s Roll Back The Software To Oreo
It’s time to roll back to Oreo if one had all the fun and desired to hover over the Android P. It is the fact that it is not stable at the current situation, so it is better to roll your device back to the stable version ii.e. Android Oreo. The steps are the same but there are only two steps which are not to be performed. First one, you don’t need to unlock the bootloader again, also one will have to download the Oreo factory image from the Google itself. Finally one will get back to the stock version again and probably one will again see the future developer preview build.
All these steps may seem very complex but everything happens for a reason and one might get a glimpse of what the Google has to offer in its next OS by the means of preview builds and Beta versions.
Leave a Reply